

Reduced Plot Armor: a mod I made that adds a random chance of death, most times in cutscenes where Shepard falls a significant distance, gets hit by a ship, or some other ridiculous over the top event occurs that seems like it could kill you. It’s not quite the Pinnacle Station release of last year, but I’d like to go over some of the unique challenges and design process for this mod, and describe the process that one goes through to design a mod such as this for the Mass Effect trilogy of games.
Development of Reduced Plot Armor started around September 24, 2022, and concluded on November 7, 2022, so it was about a month of on-and-off development.
The development pipeline
When I developed the original Mass Effect Randomizer in 2019, I had to design a system that could apply changes to a very wide set of game files that would be infeasible to do by hand. I developed code to apply a specific set of changes to various tiers of game files – entire packages, specific exports, and custom changes that are specifically targeted, such as randomizing the logic for a specific level gimmick. In Randomizer, these are displayed as options to the user, who can then select which pieces of code will be run.
In Pinnacle Station’s VTest pipeline, we scripted custom changes across a wide set of files, and it allowed us to tweak things and have it propagate to all files without having to do anything manually. This type of pipeline requires a lot of up-front work but it allows me to make iterative changes to my files and have reliable, consistent, and fast results. VTest was a fairly complex pipeline due to the scope of the project at hand.
To be clear, there are very few mods developed this way – most mod developers do everything by hand, as changes often only apply to one file, or would require more up front time to develop the pipeline than it would save in the end. In Reduced Plot Armor, I knew I would be calling the same death chance logic in multiple files, so a pipeline was a good fit for this type of mod. The pipeline for Reduced Plot Armor would need to handle an expanding scope; as opposed to VTest which had a mostly fixed end goal in mind. Things that I had to account for included TLK (localized strings) for each new death chance and patches against mods that mine would override, to name a few.
First steps
For Reduced Plot Armor, I knew up front that my changes would be done mostly through Kismet, Unreal Engine 3’s visual scripting system, which is where you have the most control over what gets called. This is how the majority of game sequencing in Mass Effect games is done. In our tooling we call this sequence editing.
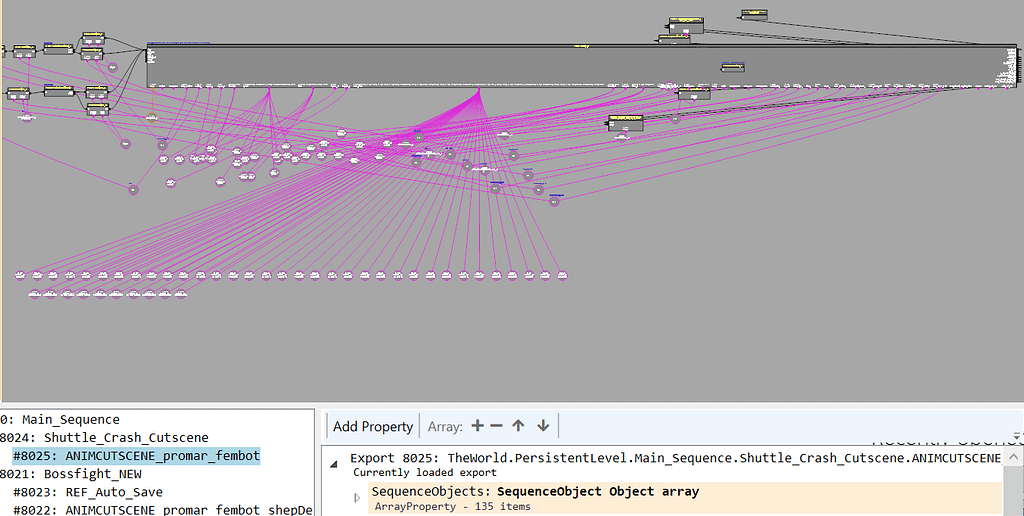
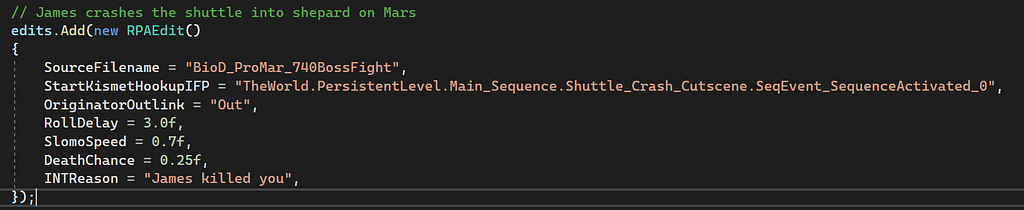
The first death roll I configured as the prototype was when James crashes the shuttle into the other one at the end of the Mars mission (early in the game). Setting up a blank working mod is easy these days with Starter Kit, a feature of ME3Tweaks Mod Manager. Conveniently Mass Effect 2 and 3 files are named according to their usage (Art, Design, Sound, etc) as well as their position in the level, which makes guessing the correct file much easier. In Mass Effect 1 there is no contextual data, just numbers, which makes finding the file you actually want a pain.
I moved the vanilla version of the game file that contained the cutscene of the shuttle crash scene into my mod’s directory (BioD_ProMar_740Bossfight), and installed the mod into the game, which made the game use my copy of the file instead of the original. DLC mods in Mass Effect games are installed side-by-side original files, loading instead of the originals, rather than entirely replacing the file on disk. This makes it easy to turn mods on and off, override each other, and a few other conveniences at the cost of disk space. Another downside is that certain files that load before DLC is parsed can’t be overridden this way, which are known as basegame-only files.
Locating what to change
Now that I had the basic mod set up and installed, I started digging through the sequencing of the file to find a reliable place I could install logic that would trigger a game over condition at the exact right time. In Mass Effect, most in-game (not prerendered) cutscenes use the AnimSequence Kismet object, which exposes an interpolation to variable inputs and outputs. For big cutscenes, they are very easy to spot, typically having their entire own sequence as well as being artpieces themselves in said sequence.
In Kismet, things are only executed when the game ticks. Ticking is a periodic update of the game and occurs every time the game renders a new frame. When you pause the game, the game engine suppresses tick events from propagating to most of the gameplay objects, such as pawns, Kismet, etc – but keeps UIs such as the pause menu ticking so they stay responsive. Ticks include information about how long it has been since the last tick, which AnimSequences use to adjust how far along they are in the animation timeline. As such, you can rely on their timing being accurate most of the time – 30 seconds into an AnimSequence at low and high framerates will be at roughly the same position.
As AnimSequences are not actual Kismet sequences, and are instead a defined set of actions on a timeline – which I don’t have a lot of experience with – I chose the alternate route of simply setting a timer right before the AnimSequence began and then executing my death roll sequence, instead of trying to edit the AnimSequence itself.
The first issue I ran into was finding where I could actually hook this timer up – I wanted only one entrypoint as close to the start of the AnimSequence as possible, but the game often has split logic before these depending on if the player is male or female. I would have to find a place before the logic split to male/female so I could add a new branch for my timer code without having to complicate the pipeline logic.
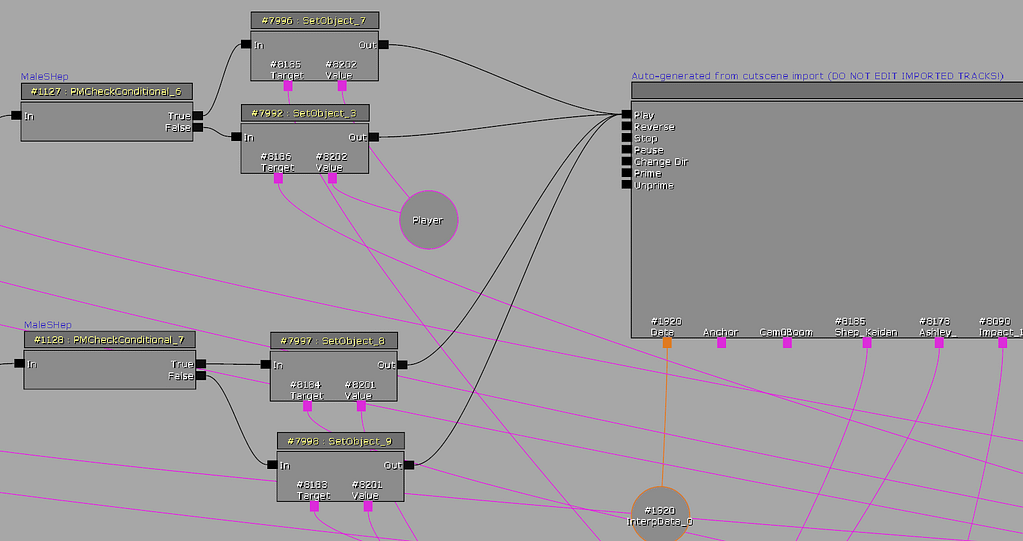
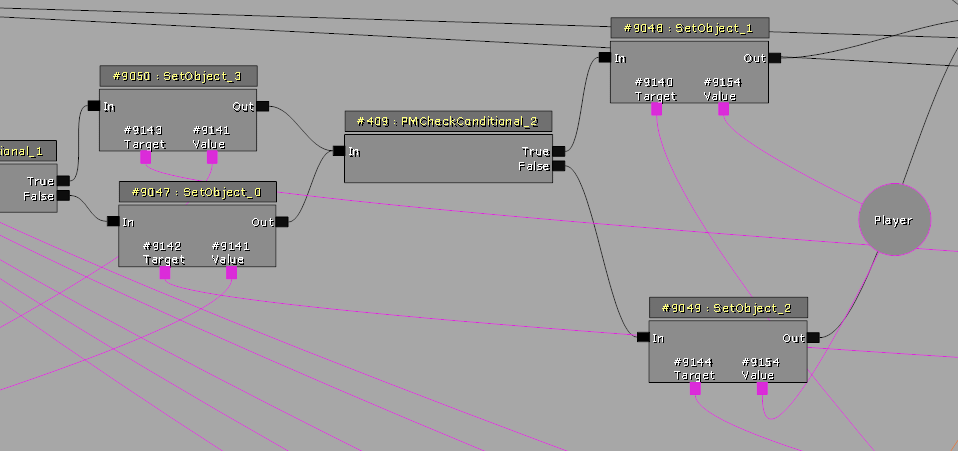
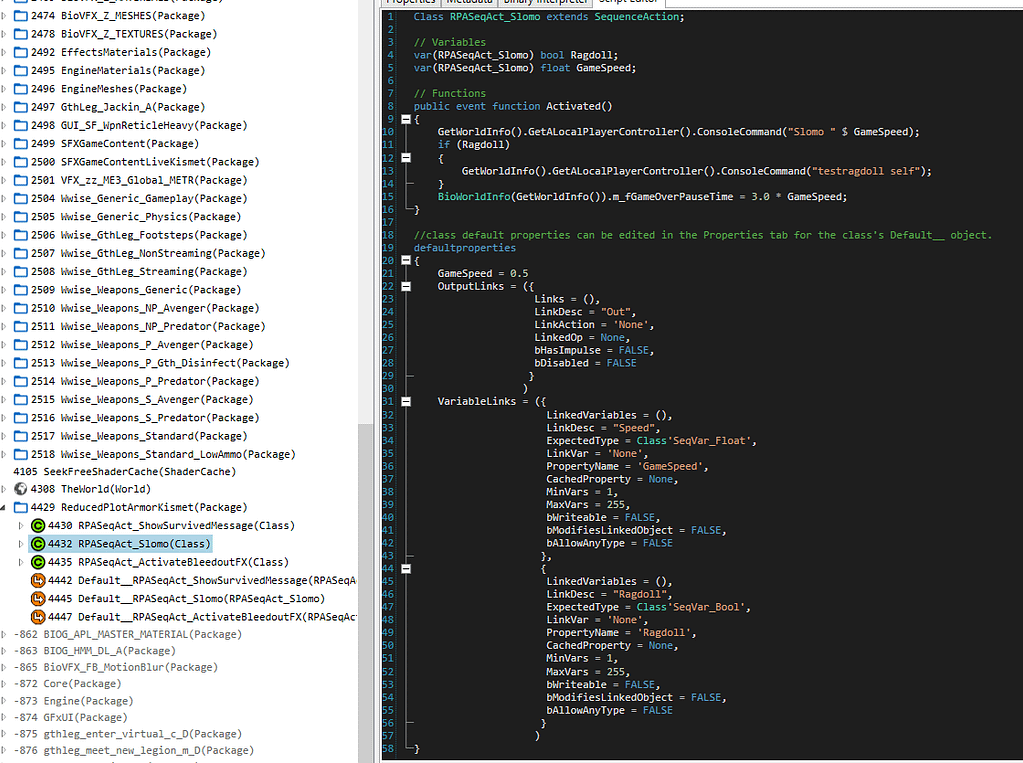
Ultimately, I chose to activate when the SequenceActivated event is called, which is when the input pin on the entire sequence is triggered. It is only a few objects before the above picture and has only one output, which means I can reliably branch off it.
Death roll logic
To make my edits easier, I would make my logic almost all self-contained in a premade sequence that takes inputs that my pipeline will configure when the changes are installed into the file. My pipeline would install a delay of a predefined time before this sequence was run, to make it perform a death roll right when the big moment happens.

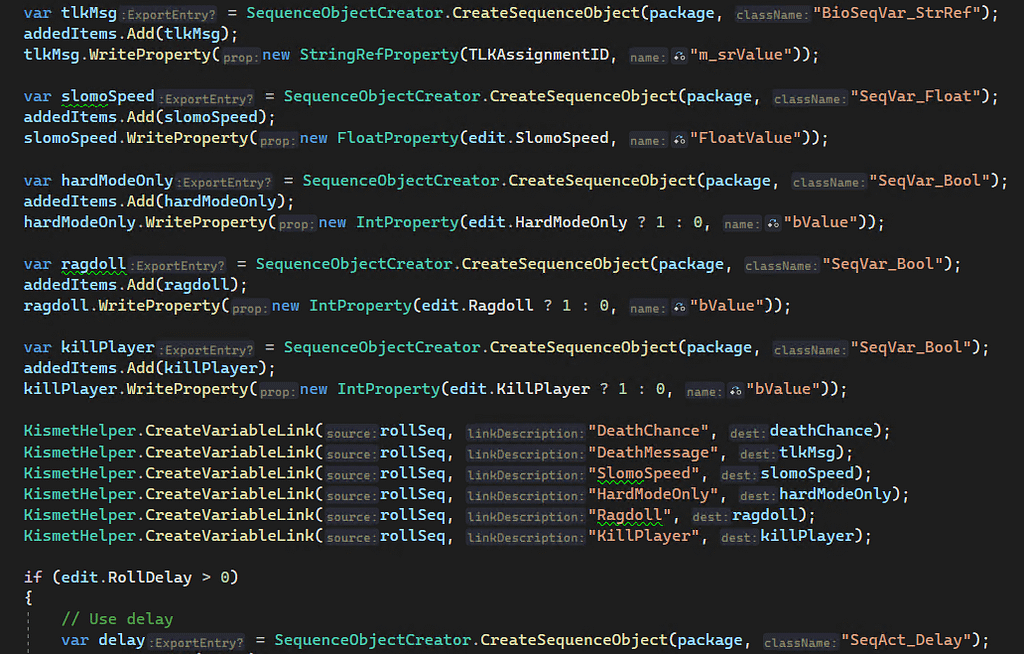
Inputs to the RPADeathRoll sequence are the configurable variables for a death roll. As development progressed, additional variables were added and installed by the pipeline. These variables were used to control the feel of the death:
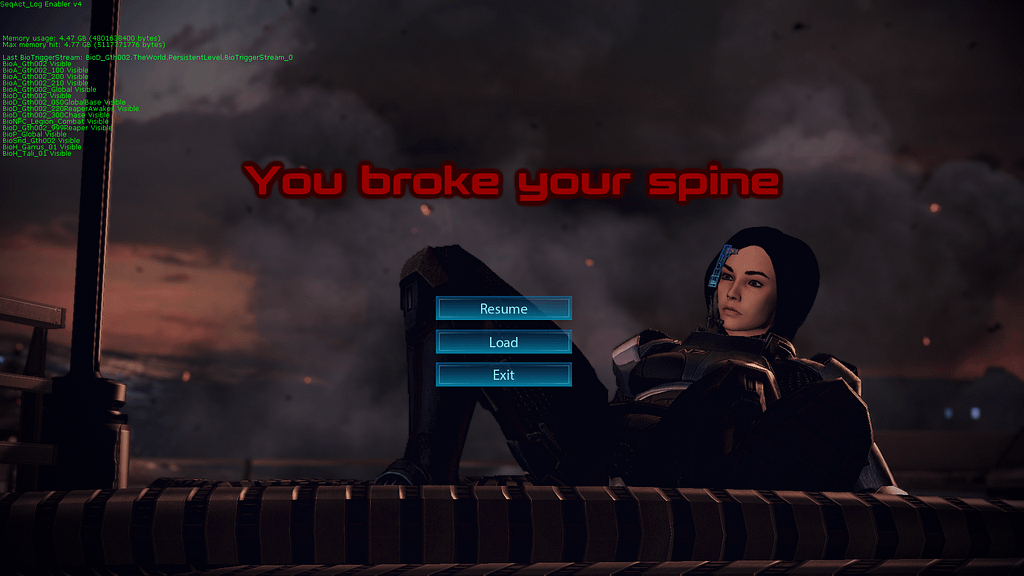
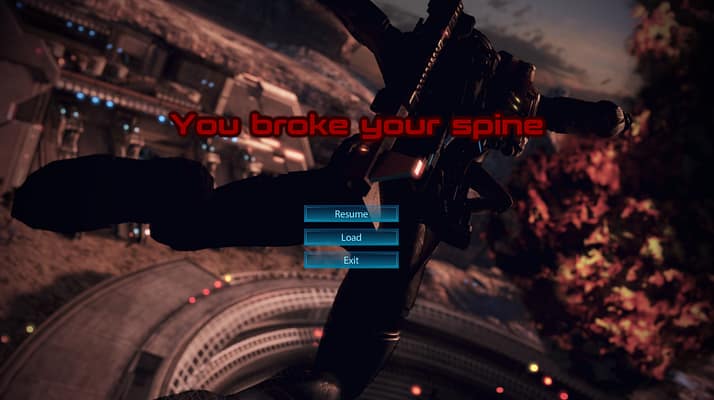
- DeathMessage: The message to display to the player when the death completes
- DeathChance: The normal mode death chance, out of 100
- SlomoSpeed: When the death triggers, this is the percent speed the game will run at. This helps inform the player they died, as well as conveniently hiding the player getting up as the AnimSequence doesn’t stop immediately when the roll occurs
- HardModeOnly: If this roll should only work when Hard Mode is enabled
- Ragdoll: Some cutscenes allow you to ragdoll the player, which helps convey that they died. Not all AnimSequences support this – some just make you disappear instead
- KillPlayer: If the actual gameover condition should be triggered. When this is false, an event is fired instead that can be listened for to trigger my own custom code, which I use for the custom ending I added to this mod
To define each death roll, my pipeline uses a list of RPAEdit objects, which includes information about which file to install to, the object to branch off of, the name of the output link of that object, as well as any non-default values of the inputs to the sequence shown above. My RPAList file contains all definitions, which makes it nice and cleanly separated from the rest of the code.
Designing the logic for the death roll is requires a bit of extra knowledge for how sequences work, such as knowing you need to hook up external variables of the sequence to the correct values in the sequence. Our tooling over the past few years has advanced that it is almost a complete clone of the Kismet Editor BioWare used. Checking if you are current in Hard Mode, if the roll is Hard Mode only, showing the bleedout effect, adjusting game speed and ragdoll, etc., is all is handled in the logic of the roll.

Custom logic for death rolls
Some features I wanted my mod to have included showing the player when a roll check succeeded – if you were lucky and made it through the entire game without dying, was it luck? Or maybe the mod wasn’t working?
I designed a few custom Kismet object classes to call other code, such as showing the ‘Your plot armor prevailed’ message, which is not something the vanilla game has a feature for in Kismet. Our tooling improvements over the past 2 years made this a far easier task than it would have been in the years prior to that. In the old days, you’d have to hex edit a class together, which was so unbelievably tedious it had only ever been done a few times. These days you can type up a class just like like you would in Visual Studio, and our editor even has code completion!

Timing it correctly
One area of significant difficulty was slow motion and ragdolling the player – something that the game natively supports, but has issues when combined with a currently playing AnimSequence. Due to the fast paced nature of the cutscenes my mod edits, they often are immediately followed by Shepard and gang getting up, which really hurts the immersion of dying. In Mass Effect, when you trigger a game over condition, there is a 3 second period where the audio drops and changes to the game over music, after which the game pauses and the game over screen is shown. Three seconds in a cutscene is a long time.
My initial solution was to just time the death earlier, but the music dropping out before the actual event occurs made it feel weird and clunky. There were also times where a 3 second window was simply not feasible – Shepard may move their mouth during that window, which obviously signals you didn’t die.
My solution was to slow the game time down in the death roll logic, using a built-in console command called ‘slomo’. This essentially changes the game’s tick rate to a modifier of your choosing. Internally this changes the game’s time dilation, but to keep my code simpler (and have less potential issues) I simply call the slomo command like you can do from the in-game console.
One of many side effects of slowing the game down is that the 3 second gameover timer still runs in game time, which means a 50% slomo yields a 6 second wait until the game over screen, which feels very strange. After a bit of research into how the game sets the timer, I wrote in-game code to modify the the initial value of the timer, stored in the ‘World’ object of the current gameplay session, something you can see on line 15 in the above below. This makes it always time to 3 seconds which makes it feel consistent, and thankfully, appears to be reset to the original value of 3 when a save is reloaded. This variable is a const variable, which means it can’t change after compile time. But since I’m the lead toolset developer, I just commented out that rule for this mod, and everything seems to work fine 🙂
Making it convincing
A few areas of fast paced motion made it hard to have a convincing death unless I slowed the game to less than 15% game speed. This was sometimes jarring – so I combined it with the ragdolling feature where the player goes limp, to simulate the player dying. If you’ve ever watched me play these games, I love ragdolling and will call ‘testragdoll self’ at random points of the game to amuse myself – which, conveniently, taught me that some parts of cutscenes let you ragdoll without breaking the whole thing!
In a similar vein to using the slomo command, I also called this ragdoll command on AnimSequences that supported it. If it doesn’t support it, you simply disappear from the scene for some reason, and I’m not really sure why. It definitely improved some scenes, such as the last one shown in the trailer for the mod.
Lost in time
Changing the game speed introduced additional complex issues that never show up in the vanilla game. One of the significant issues I had to solve was that some interfaces would run at the slow motion speed – such as the load screen UI and the game over UI. UI interfaces don’t interpolate the frames, so it felt like the game was super laggy. A couple of days of research into how the UI worked turned up a solution – there is a property on UIs that allow you to change the timing of them to real time rather than game time. This unfortunately added yet another side effect of the menu feeling very fast compared to other interfaces. So I could have the UI behave laggy (shown below), or have it run super fast to the point where it feels like the animation is off.
An alternative solution I tested was setting the game speed back to the original 100% speed when the game over timer expired – only to learn that the speed value only propagates on the next tick when done via console command – but when the game pauses, it won’t hit the next tick. Additionally, Kismet traversal only seems to occur on a tick, which means once the game pauses, I could not use Kismet to do anything anymore.
So what was my solution?
I combined both solutions – the game over UI has 3 simple buttons that fade in and out over a couple of frames when you mouse over them. I changed this interface to use real time, which means it runs a bit faster than the standard 30 frames per second it’s meant for – but I doubt anyone would actually notice this if I didn’t detail it here. As for the load screen, I modified the class in the basegame’s files to forcibly set the game’s time dilation value to 1.0 right before the interface is shown, instead of using the slomo command. The end result is how the UI normally looks:
This made the UI run at the correct speed, and did not affect anything else, as exiting the load screen at this point would take you back to the main menu. It also has the added benefit of not affecting normal deaths or the main load screen from the main menu. I don’t like to modify base game files if possible because they are more difficult to restore than DLC mods.
This could not be implemented into the load menu itself, as you might be in a section with time dilation, pause, enter the load menu, and then exit – so the solution had to be tied to the gameover screen, unless I wanted to further have to modify basegame files.
Too much optimization
A curious issue that came up was that loading a game save would produce inconsistent game behavior – sometimes you’d reload a save and it’d already be running in slow motion, but other times it wouldn’t. After some trial and error, I determined that using the ‘Resume’ feature from the game over screen would result in this behavior. The resume feature never brings up the load menu, so the fix described above would not apply.
After tracing how the resume code path is different from the load menu to load save, I found that there is a ‘FastResume’ feature in the executable that seems to recycle the TheWorld object when reloading a save, I assume to improve resume speed. I could not find a way around this issue, so I simply made another edit to the basegame to disable this optimization.

I didn’t notice any actual performance change in resuming, so I assume this was probably for the disc based Xbox 360 and PS3 platforms, and not really relevant these days (and yes, I do play on HDD, not SSD. I did not test on a MicroSD card though). I wonder what other objects are recycled here, and could we use them to pass data through a resume?
Not in my FaceFX
One final small issue that complicated things was Mass Effect’s heavy use of FaceFX, a technology used to animate a face to match a voice and display other emotions. FaceFX appears to entirely ignore the game speed (it seems to run on real time, which means game lag also affects it), meaning it will continue to play at normal speed, even if the rest of the AnimSequence is playing at a different speed. This means you might be laying face down on the ground but moving your eyes around and talking. Thankfully I only had this issue in the custom ending, where I faded the screen to black right before the face began to animate.
Putting it all together
With the logic of how the mod works laid out, the pieces all come together with my ReducedPlotArmorBuilder pipeline, which has its source code available here (will be available soon!).
The layout of the development environment was kept clean and simple; all development assets was placed under a ‘Source’ directory.
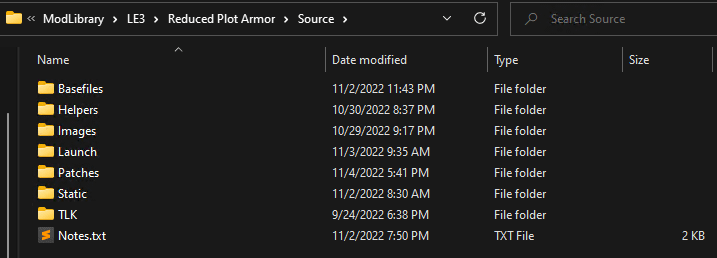
Under this was several folders that the builder would access:
- Basefiles: The files to modify and apply edits to, based on the LE3 Community Patch 1.6.2
- Helpers: Contains packages that contain my custom classes as well as the RPADeathRoll sequence
- Images: Not used by pipeline, but stored images used in the mod
- Launch: Not used by pipeline, but stored items for the mod launch
- Patches: Stored files from other mods that I would need to patch, similar to Basefiles
- Static: Files in this folder are copied as-is to the mod’s DLC directory. It contains files I premade, such as the image packages for the mod
- TLK: Contains blank TalkTable files, which I loaded into a map of Localization -> Table, so I could update each with proper strings for that language
The high level overview of the pipeline is pretty simple:
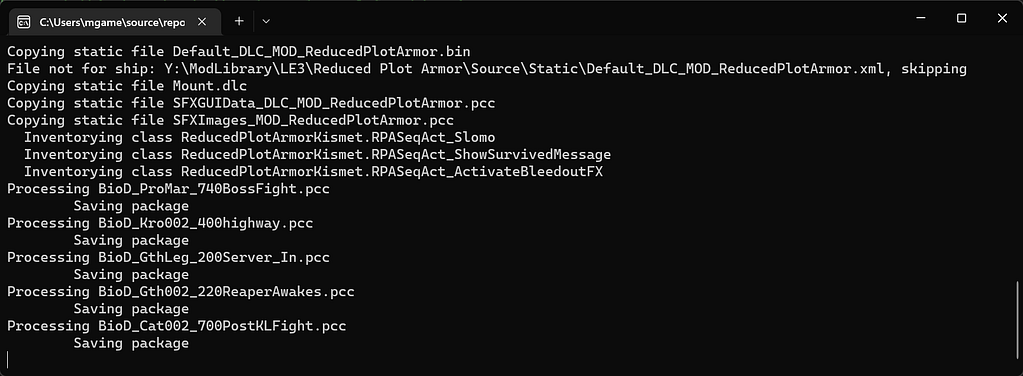
- The entrypoint of the program defines the input and output directories. This allowed me to set the game directory itself as the output, allowing me to skip the installation step during development.
- The RPABuild system deletes all files in the destination folder and copies all Static files to the destination directory.
- RPABuild opens the Helpers folder and inventories custom classes in the packages. It also gets a reference to the premade RPADeathRoll sequence that will be cloned into the files. Technically the custom classes don’t need inventoried as they are already in the package that contains the sequence.
- The TLK files in the TLK folder are loaded and mapped to by their localization code.
- A list of fixed TLK strings are installed, for things that need a fixed TLK number assigned, such as text in the settings menu that will not change over time.
- The list of edits is pulled from my RPAList class and applied one by one to the game, which I’ll go over in a bit more detail below.
- TLK files are saved to the destination directory now that all edits have been applied to them.
Applying an RPAEdit object
The actual meat of the pipeline is only about 80 lines of code long, in a method called ApplyEditInternal. This method takes an RPAEdit object, the source package path and the destination package path. It opens the source package, clones in the RPADeathRoll sequence to the appropriate location, then creates the input objects as defined in the RPAEdit object, and connects them as inputs to the RPADeathRoll sequence.
A delay object is inserted (if necessary) into the sequence with the appropriate timing, which connects to the death roll. A branch is then added from an already existing object in the sequence to our delay or sequence, which is what triggers our sequence to actually run.
Finally, some AnimSequences are set to be unskippable – to prevent players from skipping over the death chance. It’s an unfortunate side effect of this kind of mod. The package is then saved.
For patches against other mods, this same system is applied, just with input files from those mods, and output into a directory that my mod uses to store patch files for other mods.
The final product
Packaging it all up into a usable mod also led to fixing several bugs in our tooling, such as incorrect inheritance detection of custom-made subclasses. While this mod definitely didn’t move tooling forward like it did with Pinnacle Station, I think this mod is a good example of pipeline-style mod development, and will hopefully serve as a good example for other developers who do this kind of work.
There are several things I didn’t talk about here – such as learning how to use the Mod Settings Menu, a feature of the LE3 Community Patch which gives you an interface to change mod options while the game itself is running. I also didn’t cover how I used Wwise to generate a new audio bank and import it into the game, which is something we’re still working on the tooling for. I didn’t even mention the fun time I had trying to get ambient music to stop playing in the custom ending, and how I had to hackjob a way around it!
Future work
There are a few things that I may (or may not) get to in a future version of this mod, including making the blood screen effect work on all cameras – currently I’m not sure why it doesn’t affect certain cameras. I’d also like to see why ragdoll works in some AnimSequences but not others, so I can turn it on for more of them, if possible. Extending this to the other two games in Legendary Edition would probably be pretty easy, but the over the top cinematics are less common in earlier entries of the series. I’d like to improve the death roll result text to not have a spinner.
Anyways, thanks for reading!